TES Infernal Tutoring #26

Hello Legacy Storm Players! We are back with another Infernal Tutoring! Over the last month, there hasn’t been a lot of changes with the deck. While there are still divided opinions about Mox Opal, the general consensus is that two is the ideal number. While the metagame has mostly stayed the same, there seems to have been a rise in Red Stompy. While this matchup can be very challenging, cards like Pulverize can completely steal the game away from them! In the current metagame, it still feels like The EPIC Storm is where you want to be if you are playing Storm. With all of that being said, let’s jump into our scenarios!

Special Guest

A few words on Michael Clifford (cl1ffy81):

Michael began playing magic with the release of Lorwyn and entered the legacy scene in 2013. From Show and tell to Reanimator to ritual-based combo, he has committed his focus to the dark arts of storm around the start of 2016. Having played almost every iteration of storm decks in every format, he has acquired quite a love for puzzle decks, especially Ruby Storm. A Bay Area local, Michael is a student at liberal arts college Sonoma State University, working towards his undergraduate degrees in Jazz Studies and Applied Math. He is also a member of the competitive rhythm game scene and can be found playing Pump It Up or In The Groove when outside of Magic and his academics.

Deck List

SITUATION #1 – Grixis Delver

In our first scenario, we are playing against Grixis Delver! Grixis Delver is a tempo deck that looks to put pressure on the opponent by playing an early game creature threat that can be protected with Daze or Force of Will. Grixis Delver also looks to disrupt their opponent by attacking their mana base with Wasteland, and in some builds, they look to rip apart their opponent’s hand with Thoughtseize or Inquisition of Kozilek. With all of those disruptive elements combined with a fast clock, this matchup can definitely be troublesome for The EPIC Storm.

HOW I SIDEBOARDED:

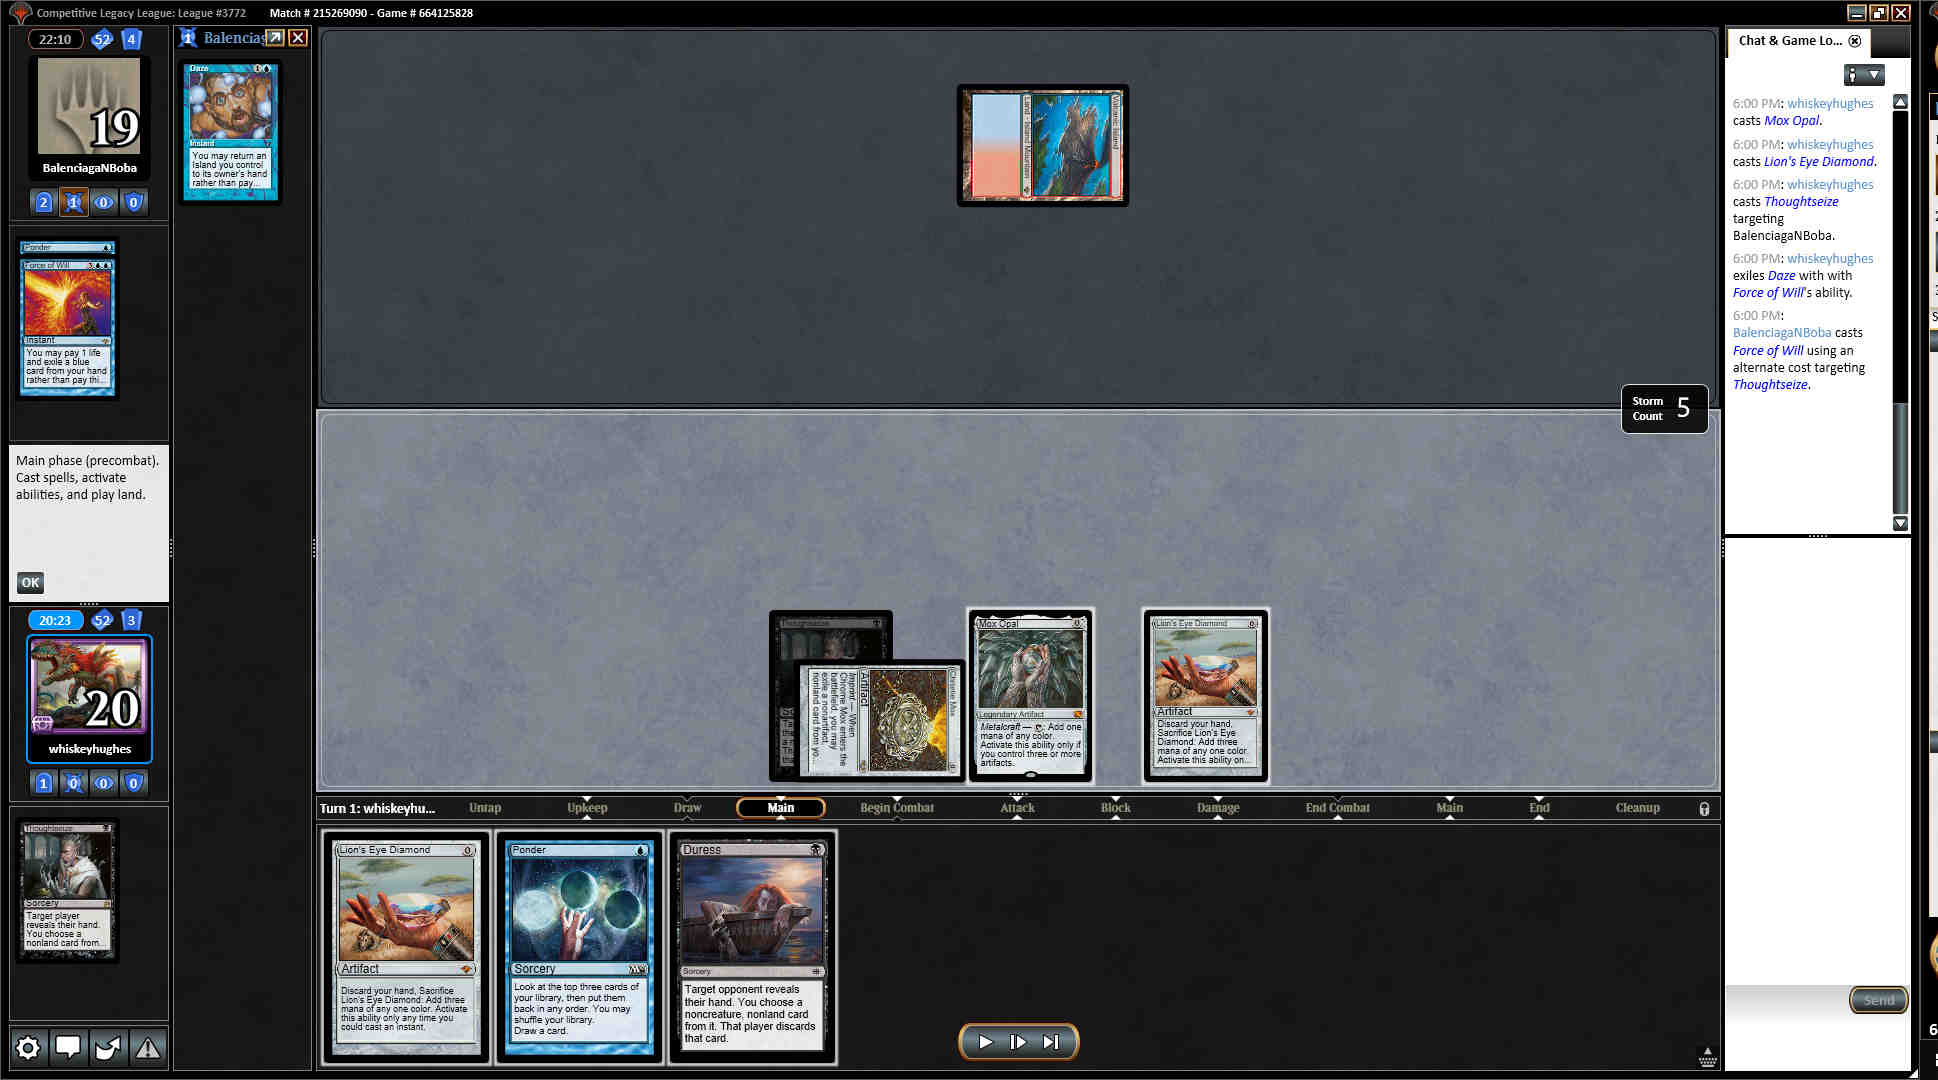
In this scenario, we are in game two on the draw. The opponent started with a Ponder and decided to shuffle. On our turn, we played out a Chrome Mox (Imprint: Thoughtseize), played Mox Opal, and then played Lion’s Eye Diamond. Once all of those spells resolved, I attempted to cast Thoughtseize. Which was countered by a Force of Will, pitching Daze. How would you play out your turn to win, or put yourself in a winning situation?

Special Guest

Michael Clifford

Opponent casting Force of Will instead of letting Thoughtseize resolve leads me to believe one of 3 possibilities:

  1. They only have a single threat in their hand. This is more likely than normal considering they shuffled their Ponder on turn 1.
  2. They have a card they value more than force. Either than a lone threat, this may be something like a discard spell or an answer to Empty the Warrens.
  3. They value the information of their hand enough to forfeit a Daze.

It may seem weird to think so much about their creatures but if the opponent has no pressure, a lot of their soft interaction such as Wasteland, Daze, and Spell Pierce lose value when they lack a clock and their deck stops functioning. I think case 3 is the least likely. Our plays so far on 1 imply pretty heavily that we do not have a land, meaning Daze is likely going to be a hard counter or cut us off a color at some point this game. I also think it is unlikely that they have discard + a black source and chose to cantrip on turn 1 over it. This leads us with putting them on either a 1 creature hand or an answer to Empty the Warrens.

Seeing them pitch a Daze is makes Pondering to set up a potential turn 2 very tempting. However, the downside of it getting Dazed is much larger than that of a Duress getting countered by Daze. If I were to choose to play into Daze here, I would definitely cast the Duress over the Ponder. However, after taking an educated guess of their hand, I would likely just pass the turn. On our following turn we can Duress through a Daze and if we don’t see one or take it away we can Ponder the same turn to set up for a turn 4 combo.

#TEAMTES

Josh Hughes

It seems weird that our opponent would cast Force of Will pitching another counter, so the question is, what are they trying to protect? I would assume that it is either a discard spell that they found with Ponder, or they are trying to bluff us. Since I won game one, I rolled the dice and played out Lion’s Eye Diamond, cast Ponder off of the Mox Opal, cracking my two copies of Lion’s Eye Diamond for 3R and 3B mana. While you can 100% miss, there are 10 cards that you can find that will most likely win you the game.


Bryant Cook

Removing Daze to me says that our opponent likely is short on blue cards, which means they likely have nothing or they have two copies of Daze. Now we have to ask ourselves, “is the upside of finding Infernal Tutor/Burning Wish and a mana source higher than the odds of them having a second copy of Daze?” but also, can you realistically win if Ponder is countered? I think the upside of using your mana this turn isn’t worth the chance of drawing dead cards for multiple turns if your opponent does have a second copy of Daze. I’d personally wait a turn and pass.


AJ Kerrigan

Even through no interaction, using Ponder and sacrificing both Lion’s Eye Diamonds in response is barely better than a coin-flip, and once you consider that I think our opponent has another Daze here a reasonable amount of the time, our odds of winning this turn go down dramatically. I don’t feel like we are in a major rush to win the game, and I really don’t want to get either of our spells hit by Daze, so I want to just pass the turn here, and plan to start next turn with a Ponder.


Anthony LaVerde

I think I would just play Ponder and most likely pass afterwards. This play let’s us set up to win next turn or the turn after more easily. If we try to go all out and play out Lion’s Eye Diamond and then crack both with Ponder on the stack and try to win, I think that’s going a little too ham. I also don’t like casting Duress this turn when we don’t know if we are going to win next turn or not. I’d rather use it at a time where we have a larger opportunity to win.


Landon Sworts

I would cast Ponder looking for Infernal Tutor and ideally an additional mana source to set up an Ad Nauseam or Empty the Warrens line on the following turn.


Alex Poling

I would be going for it here. I think letting the opponent untap and trying to be conservative is a losing proposition. By going for it we have access to 10 hits here out of 53 cards, but we get 4 looks. I would take those odds. We can hit 3 Infernal Tutor, 3 Burning Wish, 3 Empty the Warrens, or 1 Ad Nauseam. In order to go for it here I would play out the second copy of Lion’s Eye Diamond, and then cast Ponder sacrificing both copies of Lion’s Eye Diamond for 3 black and 3 red mana floating and crossing my fingers. Letting the opponent untap opens up too many cards for the opponent like an additional draw step, a discard spell, or any 1 mana counter.

SITUATION #2 – Death & Taxes

In our second scenario, we are playing against Death & Taxes! Death & Taxes has been making a huge comeback on Magic Online ever since the reprinting of Rishadan Port. While Death & Taxes has traditionally been an easy matchup for The EPIC Storm, they have recently added cards like Ancient Tomb and Chalice of the Void, which has made the matchup way more challenging after game one. Against Death & Taxes traditionally, we would just need to win through creature and land-based hate, where now they are attacking us on a whole different axis with artifact hate cards.

HOW I SIDEBOARDED:

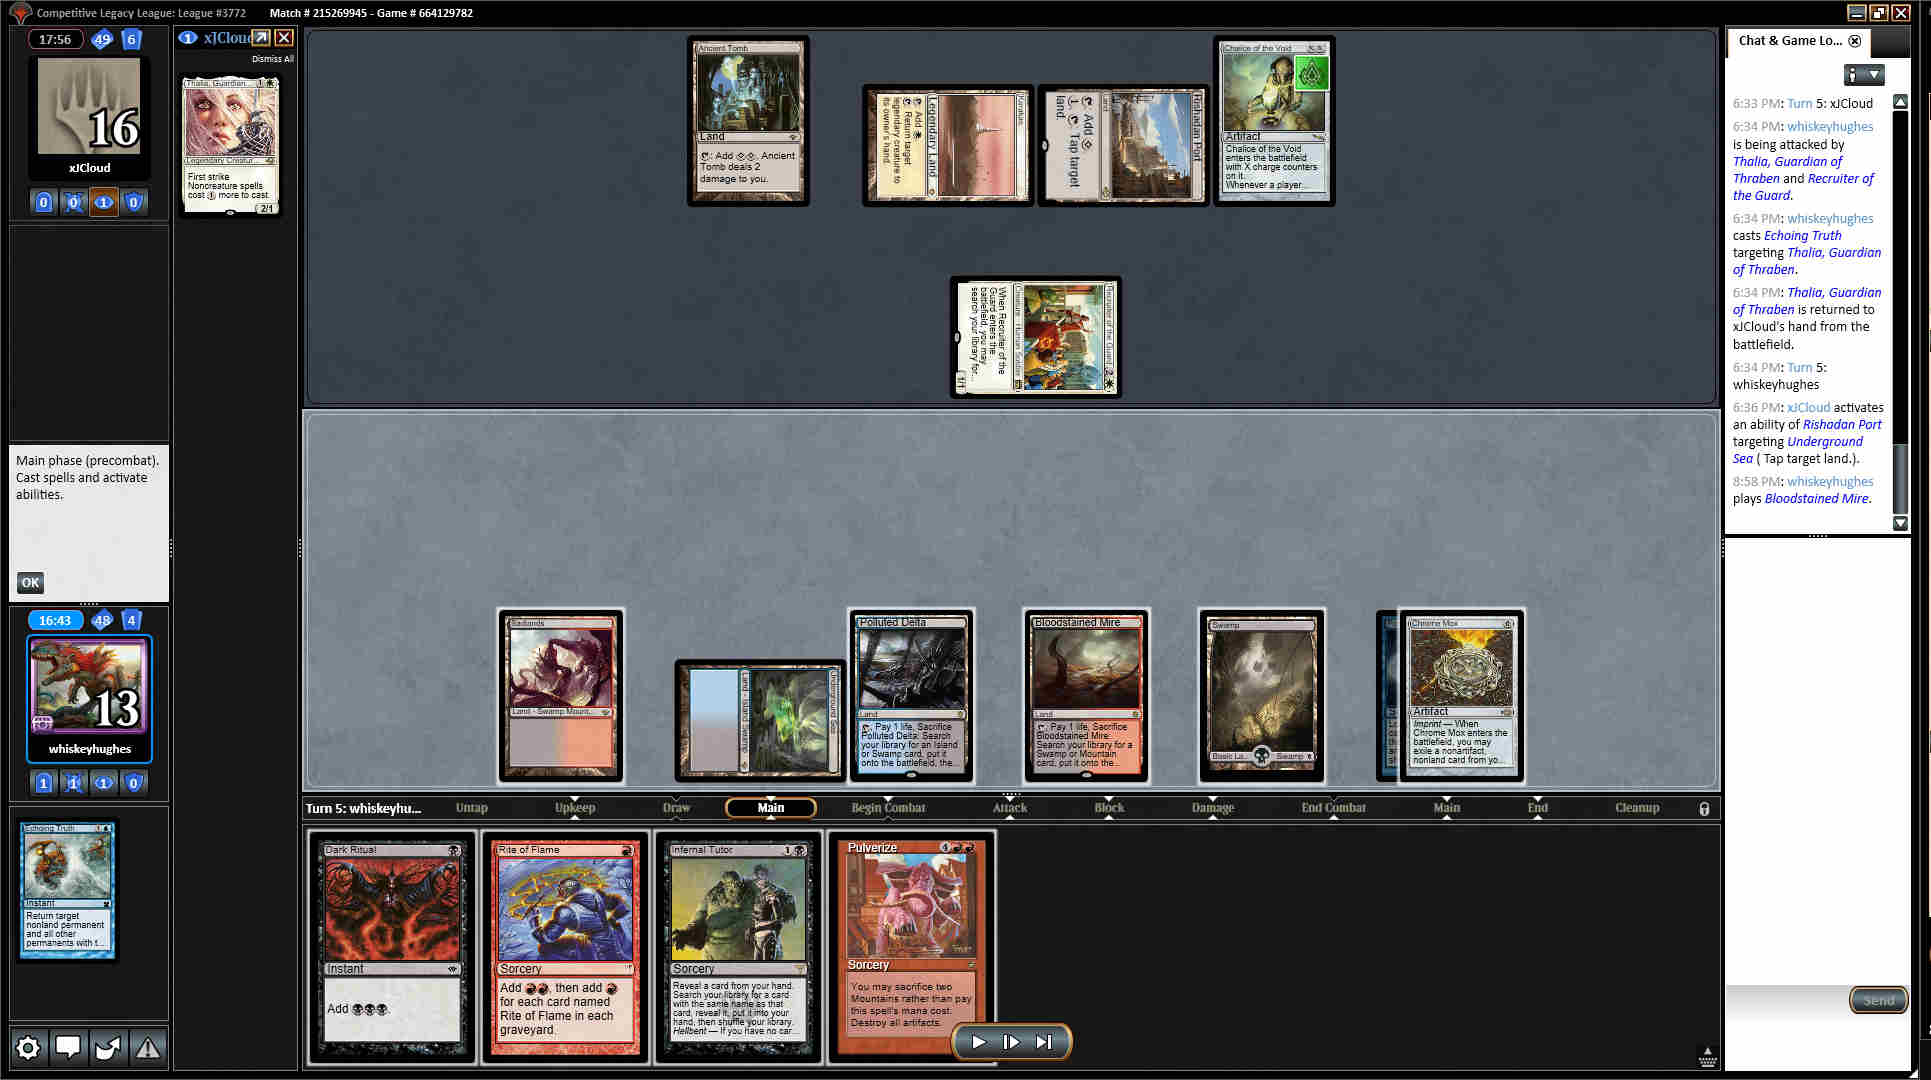
In this scenario, our opponent had all of the right hate cards, which really slowed us down. As the game progressed, we were able to grab a Pulverize from our sideboard with a Burning Wish, and then cast Echoing Truth on our opponent’s Thalia, Guardian of Thraben on the end of their turn. On our turn, our opponent activated Rishadan Port, tapping down our Underground Sea. We drew a Bloodstained Mire for the turn and played it.

Special Guest

Michael Clifford

Every Goblin Pete Venters ever illustrated was told horror stories growing up of the artificer that can take on an entire bombardment of green men. A crew of 12 Goblins will stand no chance here to a Batterskull since it will gain 4 upon blocking and 8 per turn cycle between both players’ combat phases. However, if we dodge Stoneforge Mystic being in their hand, there’s no chance a stock D&T list can come back from this board-state with an Ancient Tomb in play.

Something important to factor in is the likelihood of them having a Stoneforge Mystic given the board-state. Being that we know of 4 turns of a possible 5 from our opponent being casting Chalice of the Void, Recruiter of the Guard, Thalia, Guardian of Thraben, and Rishadan Port us on the most recent turn. So far we have not seen a window where they would have played Stoneforge Mystic if they had one or a play that is worse than landing Stoneforge Mystic. This leads me to believe they are more likely to have it than not given they are roughly 56% to have found one in 10-11 cards as a 4 of (if not higher since it is an incentive to keep a hand).

The alternative line of Pulverize and Dark Ritual into an Ad Nauseam with 1 mana floating seems more than not to kill our opponent and leaves us the possibility of going to 3 or 2 and winning on the untap (even through the Thalia, Guardian of Thraben). It’s somewhat close on which color of mana to leave floating after Ad Nauseam. This part of the scenario I feel the least certain of since I have resolved many more Ad Nauseam without Mox Opal and the 4th Chrome Mox than with them. I would lean towards leaving a red floating since a line such as Rite of Flame (making 3) — Burning Wish — Lion’s Eye Diamond or double Rite of Flame — Empty the Warrens would not work with black floating.

#TEAMTES

Josh Hughes

This is always a really hard scenario because you are essentially rolling the dice on a low life Ad Nauseam, or rolling the dice on twelve Goblins. While I think both paths are acceptable, I ultimately chose Ad Nauseam. If I was given the same option earlier in the game, chances are that I would have gone with Goblins. Death & Taxes has been trying some very weird experimental cards recently, and the opponent is already established with four mana. I would rather take the riskier route to hopefully ensure a kill on my turn without having to pass with a two turn clock.


Bryant Cook

Search up Volcanic Island, tap both red sources for mana (the Chrome Mox too), and then sacrifice them to Pulverize. From here, cast your “ritual effects”, Infernal Tutor, and Ad Nauseam while saving the Polluted Delta to save a life. What’s important here is that it can search up your last red source in Badlands, which provides you each of your starting colors. Empty the Warrens just isn’t likely to win versus a Stoneforge Mystic off the top or even a few Flickerwisps, making my decision fairly easy.


AJ Kerrigan

We can either Ad Nauseam or Empty the Warrens this turn, as we can only cast Tendrils of Agony for 12 damage. Making 12 Goblins loses to Stoneforge Mystic, so I’m more partial to Ad Nauseam from effectively 12 because I think it has a higher win-rate with so many rituals, mana artifacts, and Lion’s Eye Diamonds left in our deck. For that reason, I would use Bloodstained Mire to find Volcanic Island, float four mana, cast Pulverize, then cast our Dark Ritual and Rite of Flame, and finally Infernal Tutor for Ad Nauseam. After casting Ad Nauseam, we are at 12 and have a Polluted Delta. I like keeping the Polluted Delta because I believe the one life will matter more often than the number of times we hit both of our remaining lands and need that mana, given how many Lotus Petal, Chrome Mox, and Mox Opals are in our deck. Polluted Delta is the better fetchland to keep around because it finds all the same lands as Bloodstained Mire, but also finds Island.


Anthony LaVerde

This situation comes down to whether you want to make twelve Goblins or whether you want to cast Ad Nauseam at eleven life with two mana floating.

I’d start by cracking both of my fetches for a Badlands and a Volcanic Island and then float one black mana and one red mana with these lands, then I’d cast Pulverize sacrificing them. Essentially I’m going with the Ad Nauseam route, so after casting Rite of Flame, Dark Ritual, Infernal Tutor, and Ad Nauseam, I will have a black mana and a red mana floating. I prefer this line over Empty the Warrens because our opponent is more likely to beat that line with six cards in play and the amount of mana their lands can produce.


Landon Sworts

Sacrifice Polluted Delta and Bloodstained Mire retrieving Volcanic Island and Badlands. Tap all of our available mana sources for putting one blue, two black, and two red into our mana pool, cast Pulverize for its alternative casting cost by sacrificing two both copies of Badlands. With chalice in the opponents grave yard I would cast Rite of Flame, then Dark Ritual bringing our total mana count to eight. Using one black and one blue mana I would cast Infernal Tutor retrieve and cast Ad Nauseam leaving one red mana floating.


Alex Poling

Well, there’s really only 2 choices here. Empty the Warrens for 12 Goblins or Ad Nauseam. We cannot pass the turn due to Thalia, Guardian of Thraben coming back down. I would go for Ad Nauseam here. There is obviously a risk from 13 life, but there is also a risk with Goblins here. The opponent could have a Stoneforge Mystic, Umezawa’s Jitte, a Batterskull or any other sideboard card that may deal with them. We have enough 0 and 1 mana producers in our deck that I would go for Ad Nauseam with 1 red mana floating. By sacrificing both fetch lands, with 1 of them being a Mountain and then floating all of the mana before sacrificing 2 lands for Pulverize. Then Dark Ritual, Rite of Flame, Infernal Tutor for Ad Nauseam.

SITUATION #3 – Burn

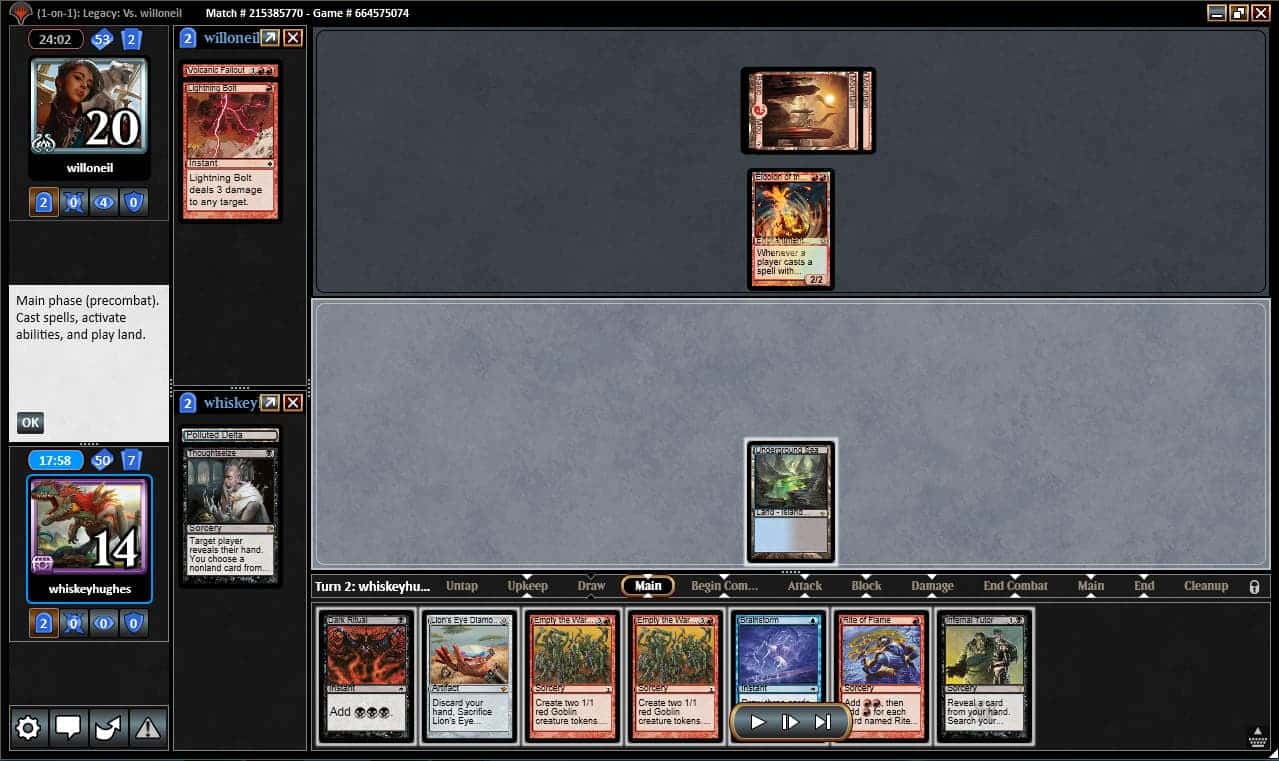
Our third and final scenario is against Burn! Burn has been a strategy since the very beginning of Magic the Gathering. You are essentially just throwing very efficient damage cards at your opponent and hoping that they don’t do something before you can kill them in two to three turns. Besides the fast clock that makes Ad Nauseam much worse, our the biggest haymaker that Burn plays against us is Eidolon of the Great Revel. The majority of my losses to burn have been because I have been locked behind this card at low life.

HOW I SIDEBOARDED:

In this scenario, we find ourselves in a frustrating spot in game two. We had the turn one Thoughtseize, which ended up taking a Volcanic Fallout. Then on our opponent’s second turn, they drew an Eidolon of the Great Revel. That put is in a bit of a bind. The opponent’s hand is currently two Mountains, so we don’t know what to expect on our next turn.


Special Guest

Michael Clifford

This is a pretty sticky situation we’ve ended up in; luckily the opponent is playing off the top. I would consider the opponent to be a favorite to win this game. That being said, I think we should assume that at least one of their top 2 cards is a land because we are almost guaranteed to lose if they have 2 spells in a row on top or ever draw a Fireblast. Now let’s do some Goblin math.

Making 8 Goblins will put us to 8 and will give us a 4 turn clock, dealing 7, 6, and 5 if they leave Eidolon of the Great Revel as a blocker. This is effectively a 3 turn clock since any spell besides Fireblast will cost them 2 life as well. If the opponent attacks after our initial 7, we still can connect for 6 and 5 by leaving a Goblin back to block. The downside of this line is we are near 0% to win if they draw any creature since every creature in burn trades profitably with a Goblin token.
Making 10 Goblins is effectively the same as making 8 since it costs us an extra 2 life, however allows us to always leave Goblins back for Eidolon of the Great Revel, negating the attack in the sequence described above gaining us the 2 life back.

Making 12 Goblins will put our opponent on a 2 turn clock and put us to 4. With 12 Goblins we attack for 11 on 3, leaving 1 to block Eidolon of the Great Revel. And 11 on turn 4 dealing exactly 20. If our opponent casts anything off the top besides Volcanic Fallout or a lethal burn spell (including a Goblin Guide or Monastery Swiftspear), we are still likely going to win on 4 due to the symmetry of Eidolon of the Great Revel.

Because of how much stronger 12 Goblins is here over 8, I would lead on Brainstorm. Drawing any land besides Island, Chrome Mox, Lotus Petal, and a few sequences involving Mox Opal will likely allow us to make between 10 and 12 Goblins (and possibly the choice of which). Brainstorm also has the potential to find a bounce spell for Eidolon of the Great Revel and potentially Empty the Warrens or loop a Past in Flames undisturbed.

#TEAMTES

Josh Hughes

To start off, I am not sure that leaving Thoughtseize in my deck was ideal, so those two points of life might have cost us the game. Obviously, if we would have been able to take the opponent’s Eidolon of the Great Revel with Thoughtseize, it could have won us the game, which makes it hard. At this point though, I would Brainstorm and pray. I could see an argument for waiting another turn because we know that there are only lands in our opponent’s hand, but each turn it gets worse for us.


Bryant Cook

I would personally Brainstorm, I think eight Goblins gives too many looks for a third land. I would want to reduce a turn off of our opponent if we’re going to cast Empty the Warrens. But it also gives you the potential chance for something greater, such as a Past in Flames line or removing Eidolon of the Great Revel from the board.


AJ Kerrigan

Using Brainstorm and waiting relies pretty heavily on finding a Chain of Vapor (or maybe Echoing Truth) very soon, which I’m not in love with. I think our win-rate is highest when we use Dark Ritual, Lion’s Eye Diamond, and Infernal Tutor to make 8 Goblin tokens. We go to 8 and give our opponent roughly five draw steps, but if all goes well, they’ll be relying heavily on drawing the burn spells in the first three or four because of the damage Eidolon will deal to them. The worst case scenario, other than running burn spells that do 4 damage, is really just them drawing a creature in the first two draw steps, as that both means we don’t have lethal and also forces us into weird blocking situations. Fortunately, if they draw a burn spell and use it, and then draw a creature, they will be at an effective 16 from their Eidolon, and be taking 7, then 5, then 3, then 1, which adds up to 16!


Anthony LaVerde

Well, eight Goblins likely wouldn’t be enough to win as it’s a four turn clock, so I would start by casting Brainstorm, hoping to hit another land or a bounce spell. If we hit another land we can make ten Goblins instead of eight, which is a three turn clock instead of four, also putting us to four life. If we hit a bounce spell we can use that to bounce our opponent’s Eidolon of the Great Revel, saving us some life.


Landon Sworts

I would Brainstorm to generate storm looking for an additional mana source to cast Dark Ritual followed by Lion’s Eye Diamond, cast Infernal Tutor; retain priority to sacrifice Lion’s Eye Diamond for three red mana, search for and retrieve Empty the Warrens and cast it making some where between ten and twelve Goblin tokens and putting our life total between four and six depending on what what cards Brainstorm adds to the equation. With two dead cards in the opponents hand they will be forced to draw perfectly or face their demise at the hands of our army of little green men.


Alex Poling

I would start off with a Brainstorm here. I think there’s a good chance we may be able to Empty the Warrens here. We would need a zero mana black source or a black land to be able to cast Infernal Tutor for Empty the Warrens for 5 storm and 10 Goblins. My plan would be to only get to 5 storm and to stay at 4 life. This would decrease the number of spells the opponent could kill us with 1 burn spell. Also, trying to wait until the next turn or an end step Brainstorm would just put us at too low of life to really do anything. You have to cast Brainstorm here and hope it’s good enough.

In closing, I just want to emphasize how good Mox Opal has been! It has singlehandedly won me so many games that would have been lost if the Mox Opal was a discard spell or another land. I think for this next month I am going to be trying out Tormod’s Crypt because of the synergy with Mox Opal. I encourage everyone to give it a try if you already haven’t!

Keep storming!

P.S Good luck to everyone who is playing in the Star City Games Legacy Open this weekend!