Happy New Year! The time is ripe for change as we usher in a new season of Magic. But until that change occurs, we have a set of fun scenarios to delve into today with The EPIC Storm.
The Legacy meta has not changed much since the last Infernal Tutoring episode. UR Delver continues to be in the top tables at each event, along with other [[Ragavan, Nimble Pilferer]] decks. Players seek to combat this presence by using everything from four- and five-color control monstrosities to Elves to new 8-Cast strategies. The EPIC Storm has often thrived in positions where fair Blue arms races are occurring. Unfortunately, the presence of other combo decks does threaten our strengths against the meta as a whole. Deck pilots need to be acutely aware of every little detail in a game to take a losing scenario to a winning one. These month’s situations might help you out.
Our list has not changed at all in recent months. v12.5 is a strong contender as one of the best combo decks in the current format. Let’s keep it that way!

Special Guest
ARI LAX
(Twitter: @armlx | MTGO: armlx)
In addition to a Pro Tour win and nine Grand Prix Top 8s in other formats, Ari Lax has a long history with Legacy Storm including multiple SCG Tour Legacy Open Top 8s. In that other format domain, he is a cohost of the Modern podcast Dominaria’s Judgment and a writer for starcitygames.com. The EPIC Storm also requires him to mention he lost the ANT versus TES semi-mirror to Bryant Cook playing for the Top 8 of a Grand Prix.
Deck List
the epic Storm
Main Deck
- 4 [[Burning Wish]]
- 4 [[Wishclaw Talisman]]
- 4 [[Brainstorm]]
- 4 [[Ponder]]
- 1 [[Tendrils of Agony]]
- 1 [[Ad Nauseam]]
- 1 [[Echo of Eons]]
- 4 [[Veil of Summer]]
- 2 [[Orim’s Chant]]
- 4 [[Rite of Flame]]
- 4 [[Dark Ritual]]
- 4 [[Lion’s Eye Diamond]]
- 4 [[Lotus Petal]]
- 3 [[Mox Opal]]
- 3 [[Chrome Mox]]
- 3 [[Verdant Catacombs]]
- 2 [[Scalding Tarn]]
- 2 [[Polluted Delta]]
- 1 [[Underground Sea]]
- 1 [[Tropical Island]]
- 1 [[Tundra]]
- 1 [[Scrubland]]
- 1 [[Badlands]]
- 1 [[Taiga]]
Sideboard
- 3 [[Prismatic Ending]]
- 2 [[Abrupt Decay]]
- 1 [[Grapeshot]]
- 4 [[Galvanic Relay]]
- 1 [[Empty the Warrens]]
- 1 [[Tendrils of Agony]]
- 1 [[Massacre]]
- 1 [[Echo of Eons]]
- 1 [[Peer into the Abyss]]
SITUATION No. 1 — BURN
Our first opponent is playing Legacy Burn! This deck is an old classic that seeks to reduce their opponent’s life total to zero quickly and efficiently with the use of “burn” spells like [[Lightning Bolt]] and [[Lava Spike]]. Lacking in significant ways to interact with our combo, Burn players seek to land a turn two [[Eidolon of the Great Revel]] and put the brakes on our strategy with the one creature. Barring that, Burn does damage in multiples of three, meaning it only takes seven spells to end us. Less, if cards like [[Fireblast]] and creatures like [[Monastery Swiftspear]] are used. The most potent burn spell that can be used against us is [[Price of Progress]], laughing at all the Basic-less tuning our mana base has undergone. Our goal is to keep hands that win quickly and avoid putting [[Ad Nauseam]] on the stack at all costs.
SIDEBOARDING:
-1 [[Ad Nauseam]], -4 [[Veil of Summer]], -2 [[Orim’s Chant]], +3 [[Galvanic Relay]], +2 [[Abrupt Decay]], +2 [[Prismatic Ending]]
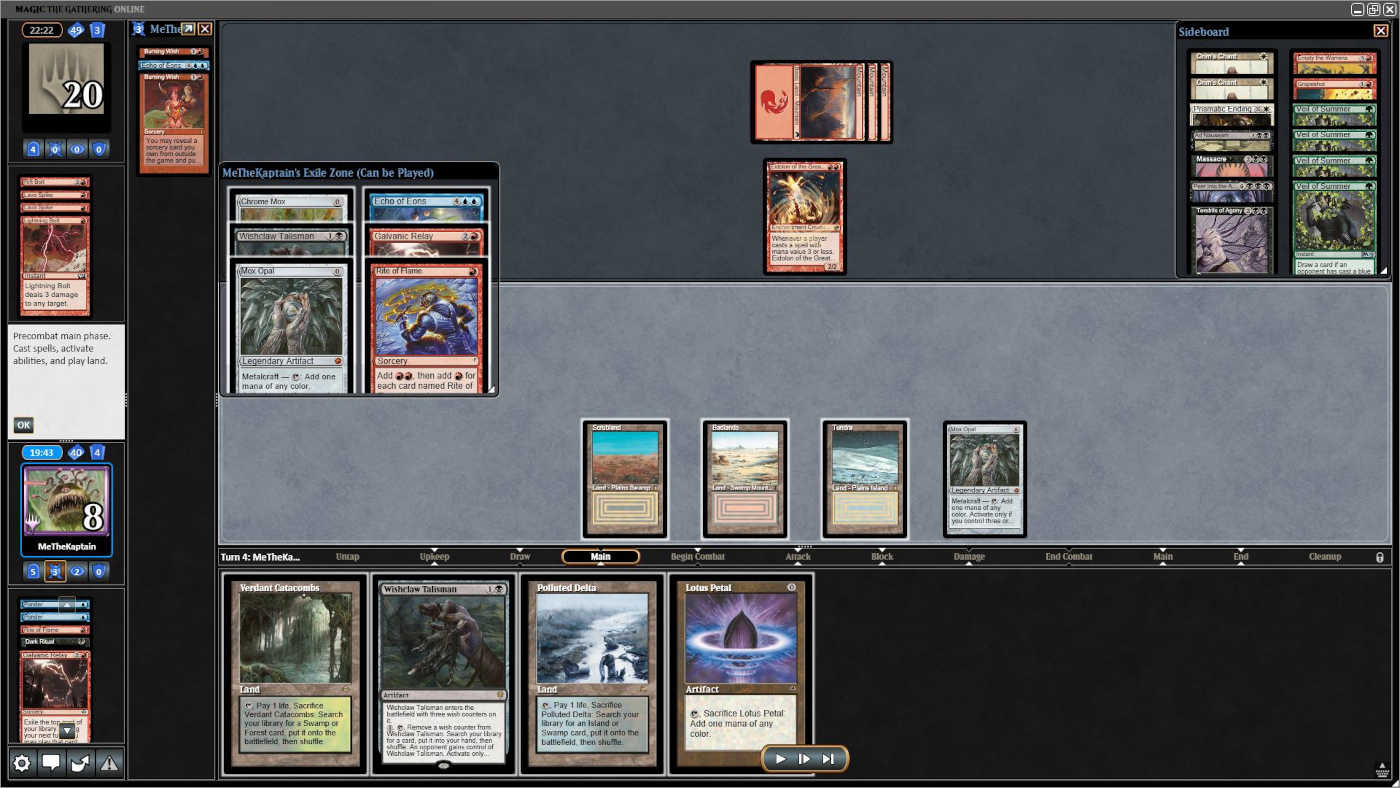
This scenario is tough. We see an [[Eidolon of the Great Revel]] sitting across from us, our nemesis. Can we win despite this hatebear on the battlefield? On the previous turn, [[Galvanic Relay]] exiled six cards for us to play with and we have already cast our sideboard [[Echo of Eons]]. What can we do to possibly stabilize from here?
Special Guest
ARI LAX
I think this is a spin the wheel and pray situation. But I’m going to lay out the failed, more deterministic math in case anyone catches a mistake.
The two options for a win from under an [[Eidolon of the Great Revel]] with low life are either using a smaller [[Tendrils of Agony]] mid-combo chain for the life buffer or just getting the removal spell. Our mana and life situations are too tight to afford a [[Tendrils of Agony]] before doing more things, so it looks like it is kill [[Eidolon of the Great Revel]] or bust. Even then, all our lines give them a [[Wishclaw Talisman]] WITH them having cards in hand. So passing the turn after taking even more damage feels like an immediate loss. We need to kill the [[Eidolon of the Great Revel]] then do more, and the exiled Galvanic Relay is off the table.
Starting with the first task: we have 8 life, so we have 3 spells (and a [[Verdant Catacombs]] fetch) to work with before we die to an [[Eidolon of the Great Revel]] trigger. Our ways to remove the hatebear all cost two. [[Wishclaw Talisman]] costs a total of three to play and activate. In total, five mana is tied up in handling that threat. The easiest way is to play a land (7 life, 4 untapped lands), play [[Wishclaw Talisman]] (5 life), play [[Lotus Petal]] (3 life), and activate [[Wishclaw Talisman]] using [[Mox Opal]] to find [[Prismatic Ending]] – casting it on [[Eidolon of the Great Revel]] (1 life, nothing untapped and a [[Lotus Petal]] left over).
With [[Eidolon of the Great Revel]] dead, we have the following things left to use:
- Cast [[Lotus Petal]], cast the exiled [[Mox Opal]] (replacing the in-play tapped one), cast the exiled [[Chrome Mox]], [[Rite of Flame]] (1 copy in the graveyard), another [[Wishclaw Talisman]], and an exiled [[Echo of Eons]]. What does that even get us?
- I keep coming up 1 mana short. The artifacts and boosted [[Rite of Flame]] are five total mana, short of the [[Echo of Eons]]. You can [[Wishclaw Talisman]] for the third [[Rite of Flame]] to net a single mana, but then you are stuck without a card to imprint under [[Chrome Mox]] so you don’t actually get anywhere. If you use [[Wishclaw Talisman]] for something that is not mana, you are (again) minus an imprint and left with a single mana. Even a perfect [[Brainstorm]] wouldn’t save us.
So scratch all that math, back to the top. We have one more line: start with [[Echo of Eons]]. Playing [[Verdant Catacombs]] and casting [[Rite of Flame]] get us to six mana for [[Echo of Eons]] and with five life and [[Mox Opal]] left over. Can we win from there?
If our first new hand has two copies of [[Lion’s Eye Diamond]], we can go to one life, play both, tap [[Mox Opal]] for mana, and flashback [[Echo of Eons]] with four mana floating. If we then draw a new hand with [[Prismatic Ending]] and cast it for X=3 (a total mana value of four so [[Eidolon of the Great Revel]] doesn’t kill us). From there maybe our other six cards plus the still-exiled [[Mox Opal]] and [[Chrome Mox]] can win the game. That would be a total of eight spells cast, so it’s not impossible, just improbable. My rough math has the odds under 1% since you need to draw a double four-of, then a specific card plus a win, and they can’t draw [[Fireblast]] ever, but that’s still more than 0%.
For the sake of whoever had to play this game, I honestly hope I did some math wrong.
#TEAMTES

Jordan Karim
This does not look like a fun boardstate to be in. Many of my original thoughts fell short of the mark, like using [[Wishclaw Talisman]] to find a removal spell for the [[Eidolon of the Great Revel]] and attempting to continue to combo off. But none of those work and we are left with an opponent that controls a [[Wishclaw Talisman]] while at a very low life total – two things that will not work against Burn.
The only option that I can see is to cast the front side of [[Echo of Eons]] and see what our new 7 cards bring us. Lets look at what that entails:
- Play [[Verdant Catacombs]] and use it to find an [[Underground Sea]] (Storm 0 – 7 Life)
- Cast [[Rite of Flame]] with one copy in the graveyard using the [[Badlands]] (Storm 1 – 5 Life – )
- Next is the [[Lotus Petal]] from hand (Storm 2 – 3 Life – )
- Front cast the [[Echo of Eons]] from exile using the floating mana and keeping the [[Lotus Petal]] uncracked (Storm 3 – 3 Life)
From here, there are a few options that allow us to continue living. We have access to casting 1 spell that triggers [[Eidolon of the Great Revel]]. Our mana available is an untapped [[Scrubland]], [[Lotus Petal]], a [[Mox Opal]] without Metalcraft, and our exiled [[Chrome Mox]] and [[Mox Opal]]. The hit we need is [[Prismatic Ending]] that we can cast for X=3, avoiding a lethal [[Eidolon of the Great Revel]] trigger. With a [[Wishclaw Talisman]] in exile and a fresh 7 cards, there can be fresh hands that lead to a win. We also have the option to Flashback the [[Echo of Eons]] if we need to.
A lot has to go right in this scenario, but there are possible outs available. The one caveat to this is our Burn opponent cannot find a [[Fireblast]] at any point during the combo turn. Our life total is too precarious and we fold to their “free” burn spell immediately.

Bryant Cook
My first thought was to begin by tapping [[Badlands]] to cast [[Rite of Flame]] (Storm 1 — 6 life) to make . Use [[Scrubland]] to play [[Wishclaw Talisman]] (Storm 2 | floating — 4 life), use a to activate [[Wishclaw Talisman]] for [[Prismatic Ending]] and cast it on [[Eidolon of the Great Revel]] (Storm 3 — 2 life). Now you can play a [[Verdant Catacombs]], use it going to 1 life… play [[Lotus Petal]] and [[Chrome Mox]] to create Metalcraft. Now we can tap [[Mox Opal]], play another [[Mox Opal]], and [[Wishclaw Talisman]]. You could even activate [[Wishclaw Talisman]] for [[Lion’s Eye Diamond]] but that doesn’t go anywhere since you can’t discard [[Echo of Eons]] from the exile zone.
I think that means that we need to cast [[Rite of Flame]] (Storm 1 — 6 life) to make , use [[Verdant Catacombs]] to search up [[Underground Sea]], play [[Lotus Petal]] (Storm 2 | floating — 3 life) and hard cast [[Echo of Eons]] looking for a hand that wins while also being able to start on [[Prismatic Ending]] (while not dying to [[Fireblast]]). It’s fairly unlikely, but it does give us a chance.

Alex Poling
This is a really hard scenario, and I don’t see a way to win. I would play the [[Verdant Catacombs]] and sacrifice it for a [[Tropical Island]]. Then I would cast the [[Lotus Petal]] from hand, and the [[Rite of Flame]] and [[Wishclaw Talisman]] from exile. This triggers [[Eidolon of the Great Revel]] three times and I would lose one life from the fetchland to bring my life down to one life. This also gives me Metalcraft, , one untapped [[Scrubland]], the [[Lotus Petal]], and the [[Mox Opal]]. Then I would use the [[Mox Opal]] to activate [[Wishclaw Talisman]] to get and cast [[Tendrils of Agony]] for four copies and eight damage. This puts the opponent at 12 and me at 9. My plan would be to use the [[Wishclaw Talisman]] and my draw step on the following turn to try and access the [[Tendrils of Agony]] in my sideboard. I don’t know if that will be good enough to win, but it survives at least another turn and leaves outs.

Alex McKinley
The most important thing to realize about this situation is that the [[Rite of Flame]] in our hand is actually a plus two because of the [[Rite of Flame]] already in the graveyard. Most of the plans involving the [[Galvanic Relay]] lose the game because the opponent will have a [[Wishclaw Talisman]] to kill us. The line that gives the best odds of winning is playing [[Polluted Delta]] (finding [[Underground Sea]]), casting [[Rite of Flame]] (five life), [[Lotus Petal]] (three life) and [[Echo of Eons]] with [[Scrubland]] untapped and a [[Lotus Petal]] in play. The hope is to draw one of the four removal spells (47%) and for the opponent to not draw [[Fireblast]]. Keeping the [[Galvanic Relay]] cards makes the [[Echo of Eons]] pretty likely to win the game, given that there is still the option to flash it back.

Greg Sor
Cracking [[Polluted Delta]] for [[Underground Sea]] brings us to 7 life. Next, cast [[Rite of Flame]] for going to 5, [[Chrome Mox]] not imprinting a card, and going to 3 life. Play the [[Scrubland]] and use it to cast [[Wishclaw Talisman]] going to 1, tap [[Mox Opal]] for , tutor [[Tendrils of Agony]] and cast it with Storm for 4 and going to 9 life, our opponent down to 12 life.
When we pass the turn our opponent will attack for 2 and we go to 7 life. If they have a burn spell we are dead because they can tutor [[Fireblast]] with the [[Wishclaw Talisman]] and kill us. If not, they can tutor a second [[Eidolon of the Great Revel]] and pass the turn going to 10. On our turn we can draw or tutor for [[Burning Wish]] and play [[Massacre]], going to 3 life, with a [[Wishclaw Talisman]] in hand stabilizing the game. We are still dead to any burn spell our opponent can draw.
SITUATION No. 2 — Abzan Loam
[[Life from the Loam]] strategies are as varied as they are strong in this current meta. From Lands to Bant Control, [[Life from the Loam]] is seeing a renaissance of use. In this particular build, our opponent has paired the marquee card with threats/tutors in [[Elvish Reclaimer]], [[Knight of the Reliquary]], and [[Green Sun’s Zenith]]; White removal in [[Prismatic Ending]]; and a lands package including four [[Urza’s Saga]]. As with most fair non-Blue decks, the sideboarded games are significantly more difficult than the first. [[Collector Ouphe]] is the biggest concern of ours, able to be tutored with [[Green Sun’s Zenith]] and work in concert with [[Wasteland]] to hinder our mana development in the early and mid-game. Other cards they have access to include [[Force of Vigor]] for additional artifact hate, and [[Plague Engineer]] to remove early [[Goblin Token]]s from [[Empty the Warrens]].
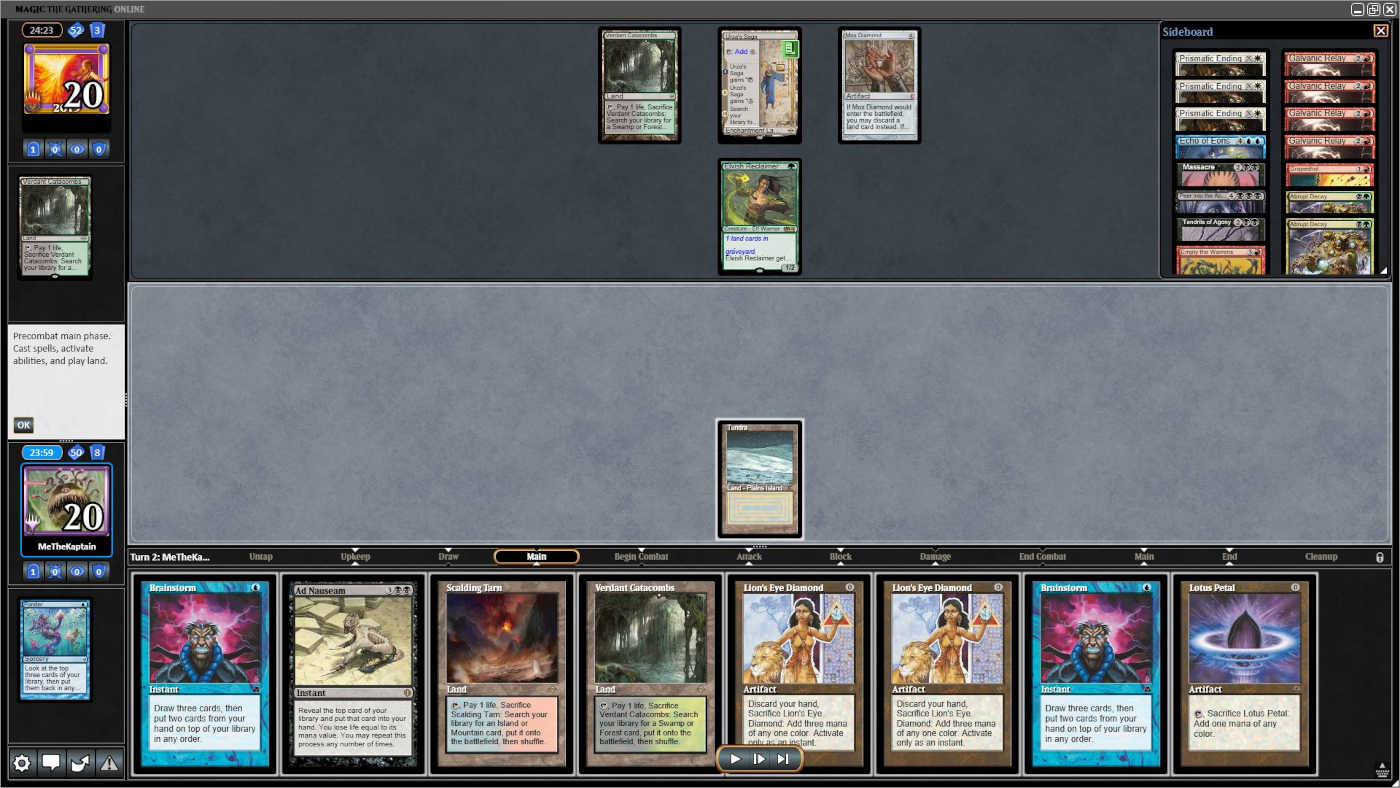
We are in game one and our turn two draw was [[Ad Nauseam]], normally something we want to tutor with [[Wishclaw Talisman]]. How can we turn a profit for the home team?
Special Guest
ARI LAX
An old but fun one that used to be more common during the way-back-when times of [[Mystical Tutor]].
The very basic plan is to play [[Verdant Catacombs]] and fetch, play [[Lotus Petal]], cast [[Brainstorm]], put [[Ad Nauseam]] on top of your library. Play both [[Lion’s Eye Diamond]]s, [[Brainstorm]] again, sacrifice the [[Lion’s Eye Diamond]]s in response, draw [[Ad Nauseam]], and cast it using that mana with 19 life, floating and a [[Lotus Petal]] remaining.
Now a lot of minor details:
- First Question: For the choice of colors for that last floating mana, it doesn’t matter much with the [[Lotus Petal]] but I prefer mana because it is likely we need more of that for casting [[Tendrils of Agony]]. To leave mana up here I would need to be stuck on exactly one mana left with way more [[Rite of Flame]]s left in the deck than [[Dark Ritual]]s.
- Next Question: To play both copies of [[Brainstorm]], we either need to fetch a blue source, costing a life and leaving us with [[Lotus Petal]], or we can use the [[Lotus Petal]] and skip a land drop, saving the life under the assumption that we can find a dual land off [[Ad Nauseam]]. This is pretty small, but I prefer the [[Lotus Petal]] play because the lingering artifact makes [[Mox Opal]] more reliably active in corner cases where you run out of life before finding multiple non-[[Mox Opal]] artifacts. These are low odds and I could see the counter-argument of a life point adding more value, but you will have used a few of those artifacts already in this game. Also even if you do conserve a land drop and find a dual land to save that fetch life, you might need [[Badlands]] to cast [[Rite of Flame]] and only have [[Underground Sea]].
- Another Question: What can go wrong here? Our opponent has an active [[Elvish Reclaimer]], what can they find? [[Bojuka Bog]] shouldn’t matter. The main thing to consider, which is fairly unlikely in 2022, is a weirdo main deck [[Abrupt Decay]] or [[Force of Vigor]] that can hit a [[Lion’s Eye Diamond]] at a bad time.
So we don’t let them do that. This is why I specified playing the copies of [[Lion’s Eye Diamond]] after the first [[Brainstorm]] so they don’t have a window to destroy one before you get set up in the following ways to ignore a [[Shatter]]-type effect.
If you drew another way to make mana, great. Play that new mana source, then play the first [[Lion’s Eye Diamond]] followed by the second. If they kill the first one, you will have enough mana to [[Brainstorm]], sacrifice the first [[Lion’s Eye Diamond]] in response, and play [[Ad Nauseam]] anyway.
If you don’t draw mana, but draw a [[Ponder]] or [[Brainstorm]], you are also safe. Put that back on top with [[Ad Nauseam]]. If they kill the first [[Lion’s Eye Diamond]] in response to the second, you can [[Brainstorm]], in response use [[Lion’s Eye Diamond]] for , then leave yourself with another cantrip in hand and the [[Ad Nauseam]] on top. From there you just repeat the cantrip, sacrifice [[Lion’s Eye Diamond]] in response ( floating) and have the mana to cast [[Ad Nauseam]].
#TEAMTES
Jordan Karim
Covering classic or well-known situations is important! New players need to know about all of the tools in their arsenal. This one is particularly fun.
Drawing the [[Ad Nauseam]] is actually great right now. Start by playing a fetchland and cracking it to find an [[Underground Sea]]. Sequencing can be important here if we want to optimize our play against [[Force of Vigor]] or forced shuffle effects like [[Surgical Extraction]]. But since this is Game 1, I am significantly less concerned about that possibility. Cast [[Brainstorm]] and float [[Ad Nauseam]] on top of the deck making sure to keep the second [[Brainstorm]] in hand. Our draws from [[Brainstorm]] don’t necessarily matter but if we can cast more artifacts, do so here. Next is to deploy our [[Lotus Petal]] and copies of [[Lion’s Eye Diamond]]. Finally, we hold priority, cast the second [[Brainstorm]], and crack the copies of [[Lion’s Eye Diamond]] for . Resolve the [[Brainstorm]] by keeping the floated [[Ad Nauseam]] in our hand. From there we can cast it at 20 life for a straightforward combo turn.
Small optimizations can happen during this sequence as well. For example, there will be one mana floating post-[[Ad Nauseam]]. It can be any color, but our thoughts need to be about what happens with [[Chrome Mox]]. Because [[Wishclaw Talisman]] cannot imprint under [[Chrome Mox]], floating can allow us to [[Dark Ritual]]. Floating is less necessary because we can imprint any excess copies of [[Burning Wish]] drawn (we can also kill with the maindeck [[Tendrils of Agony]] and not need to cast [[Burning Wish]] at all).
Bryant Cook
This line was a lot more common during the [[Gitaxian Probe]] era.
The line is simple. Start off with using [[Verdant Catacombs]] for [[Underground Sea]] and cast [[Brainstorm]] putting [[Ad Nauseam]] on top. Cast [[Lotus Petal]], [[Lion’s Eye Diamond]], [[Lion’s Eye Diamond]], and now [[Brainstorm]] again. This time sacrifice both copies of [[Lion’s Eye Diamond]] for , resolve [[Brainstorm]] (keeping [[Ad Nauseam]] in hand), and then cast [[Ad Nauseam]].
Alex Poling
This scenario is pretty common when we have lots of cantrips and [[Lion’s Eye Diamond]] in the deck. I would lead off with either fetchland and immediately search for another blue source. Then I would cast a [[Brainstorm]], and assuming it didn’t find anything better, I would put the [[Ad Nauseam]] and a random card that I just drew back on top. Then I would play out both copies of [[Lion’s Eye Diamond]] and cast the second [[Brainstorm]]. With that on the stack, I would sacrifice both copies of [[Lion’s Eye Diamond]] for . [[Brainstorm]] would resolve and I would keep the [[Ad Nauseam]] and put the other two cards back and then immediately cast it using the floating mana. This should be good enough to win the game.
Alex McKinley
This is a pretty simple optimization line: do not play the fetch land! I would start the turn by casting [[Brainstorm]] and putting back [[Ad Nauseam]] and one of the lands. From there, I would cast both copies of [[Lion’s Eye Diamond]], the [[Lotus Petal]], cast the second [[Brainstorm]], hold priority, crack the [[Lion’s Eye Diamond]]s for black and cast the [[Ad Nauseam]] that was just put on top of the deck.
Greg Sor
The only instant card that can mess up our plan is [[Force of Vigor]] (assuming we are not considering [[Surgical Extraction]]), which means we need to play out our [[Lion’s Eye Diamond]] as the last cards in the sequence. My play would be: fetch for a blue source and cast [[Brainstorm]] with [[Tundra]]. If we find any rituals, copies of [[Lion’s Eye Diamond]], or [[Lotus Petal]] we win. If we find [[Chrome Mox]] and an imprintable card we win. With [[Mox Opal]] we still can lose to [[Force of Vigor]] unless we find another non-[[Mox Opal]] zero-mana artifact.
Regardless of any of the cards we draw, we want to put back our [[Ad Nauseam]] on top of our library, play out the two copies of [[Lion’s Eye Diamond]], [[Lotus Petal]], and cast [[Brainstorm]] holding priority. Cracking both the [[Lion’s Eye Diamond]], we draw [[Ad Nauseam]] and cast it. We will face a problem if our opponent decides to use [[Force of Vigor]] targeting our first [[Lion’s Eye Diamond]] when the second one is on the stack (and we draw nothing with [[Brainstorm]]) because the total amount of mana we can produce is 4 – not enought for our [[Ad Nauseam]] plan. Another way to stop us may be to [[Surgical Extraction]] any of our cards, preventing us from drawing the [[Ad Nauseam]] off the top, but we will already have a Storm count of 6 when [[Brainstorm]] resolves, so any tutor or [[Tendrils of Agony]] should close the game.
SITUATION No. 3 — UR Delver
Yet again, we face the so-called boogeyman of the format. [[Delver of Secrets]] decks (or more accurately, [[Ragavan, Nimble Pilferer]] decks) are still at the top of the meta, leading to many discussions revolving around cards in the deck and their longevity in the Legacy format. Early threats backed up with countermagic and disruption is a sure-fire way to succeed in Legacy. The cards that are of most concern to Storm players are [[Force of Will]]/[[Force of Negation]], [[Daze]], [[Wasteland]], [[Surgical Extraction]], [[Pyroblast]]/[[Hydroblast]], and [[Meltdown]]. They don’t like losing to combo! These Delver decks are not typically playing [[Null Rod]] like they used to, favoring more stack-based interaction over something that can be removed with [[Prismatic Ending]] and doesn’t impact [[Urza’s Saga]] enough – a small consolation and one that moderately alters our sideboard plan. Our biggest goal is to overwhelm their interaction with [[Galvanic Relay]] backed up with [[Orim’s Chant]]/[[Veil of Summer]] protection. If we get a read that we don’t have to bring in copies of [[Abrupt Decay]], all the better.
SIDEBOARDING:
-2 [[Ponder]], -1 [[Ad Nauseam]], +3 [[Galvanic Relay]]
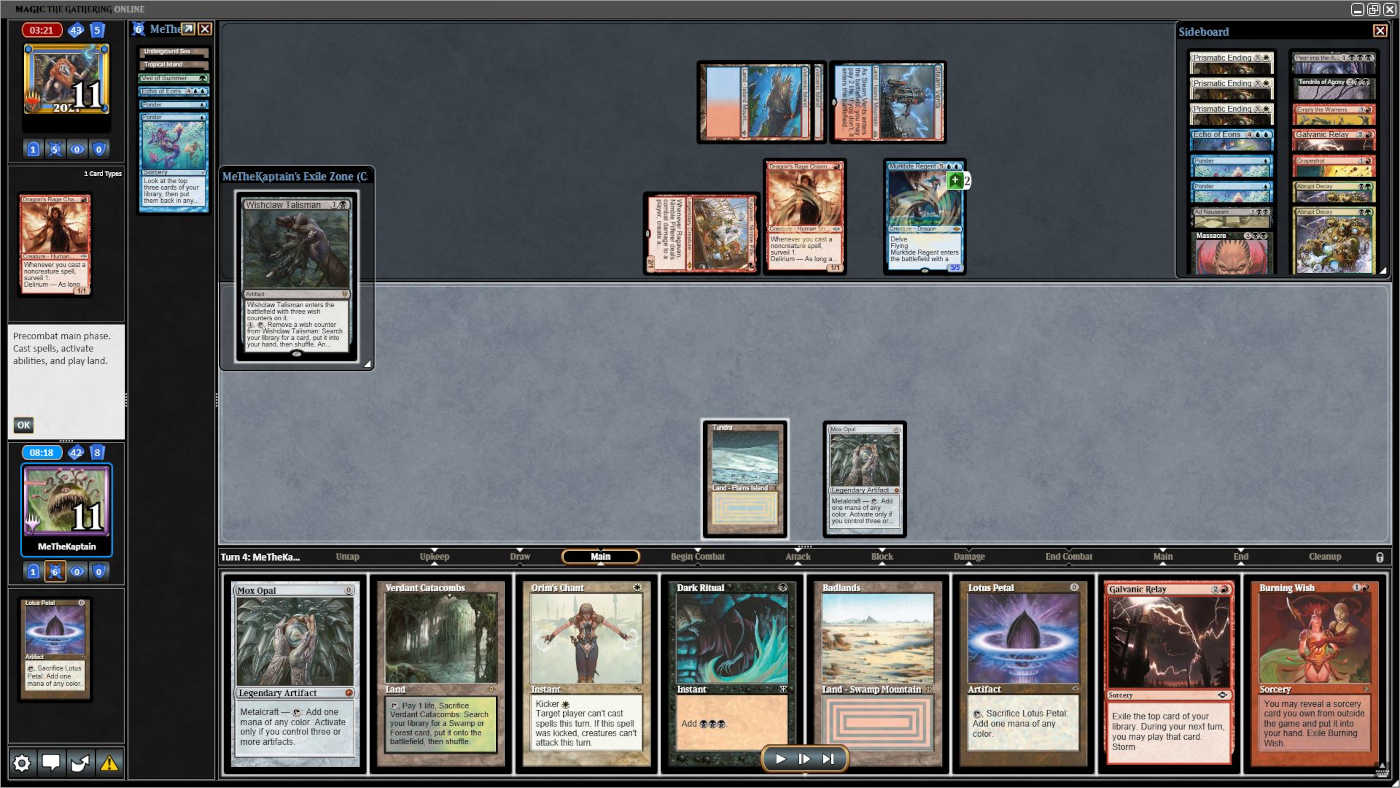
We’re in a crazy third game! After two turns casting large [[Galvanic Relay]]s where one whiffed and the most recent one had the Storm trigger countered by a [[Stifle]], we have reached the position shown with the help of our main deck copy of [[Echo of Eons]]. We just untapped and drew a [[Burning Wish]]. Note our exiled [[Wishclaw Talisman]], able to be played this turn. How would you proceed through this turn and provide the highest chance for success this turn or the next?
Special Guest
ARI LAX
The first thing to realize is we have a win with [[Orim’s Chant]] here since our opponent is low on life. We just have to be smart with Metalcraft.
Tapping [[Tundra]], we can cast [[Orim’s Chant]]. Next play [[Badlands]] and cast [[Lotus Petal]], [[Dark Ritual]], and [[Wishclaw Talisman]] ( floating, [[Mox Opal]] and [[Lotus Petal]] unused). Now that you have Metalcraft, tap [[Mox Opal]] for , replace it with your other [[Mox Opal]], tap that for , then active [[Wishclaw Talisman]] leaving and [[Lotus Petal]] back. Tutor [[Lion’s Eye Diamond]] with your search, play it, play [[Burning Wish]], sacrificing [[Lion’s Eye Diamond]] in response, and [[Tendrils of Agony]] from the sideboard for 16 life.
If your opponent has multiple copies of [[Daze]] or [[Force of Will]] you lose. But can you really beat that given another turn?
You currently survive another turn. They have eight power in play and even if they hit Delirium to pump [[Dragon’s Rage Channeler]] you survive at one life. You die to [[Lightning Bolt]] or some very weird lines where they fill up a graveyard with spells and have a second [[Murktide Regent]]. You can even upkeep [[Orim’s Chant]] with kicker off of a fetched [[Scrubland]] to cleanly save yourself from any attack.
But even if you survive, what does that look like? That safety [[Orim’s Chant]] costs you a one life point margin against the simple Delirium pump, so you lose most games they have the multiple copies of [[Force of Will]] you tried playing around. They can [[Wasteland]] you regardless of [[Orim’s Chant]]. They can [[Ponder]] or [[Brainstorm]] or [[Spell Pierce]] or [[Stifle]] with mana. It’s just all bad news. And out of this you get – a [[Galvanic Relay]] for a few cards? Does that even usually beat the double free counterspell that beats your current hand?
It sounds to me like a lot can go wrong, and I probably haven’t even thought of all the ways their cards can line up poorly if you pass. I wouldn’t even trust any math I did trying to figure out which case is worse because I would miss some other way to lose here.
Unless some earlier information leads me to believe the win right now was 100% locked out by their hand, I’m going for it, and what happens happens. Passing the turn ends poorly in too many ways, and even if none of those scenarios happen it probably still loses to the exact cards the immediate win does.
#TEAMTES
Jordan Karim
Our plan this turn is going to hinge on the decisions and interaction our opponent has available to them. We have two main options that give us high likelihoods of wins. The fist is straightforward if our opponent does not interact. The second is slightly riskier but necessary if [[Force of Will]]/[[Force of Negation]] or [[Daze]] is used.
Both lines start in the same way. Play [[Badlands]] for turn to start things off. Our opponent is unlikely to interact with a [[Lotus Petal]] and it will protect against a possible [[Daze]] or [[Surgical Extraction]], cast it. Then cast [[Orim’s Chant]], targetting our opponent. This is where our opponent makes the decision for us:
- Two Interactive Spells: Lets start off easy, we cannot beat this from our opponent. With properly timed counters at least, our best laid plans would fall short of victory. There is one scenario where they [[Daze]] the [[Orim’s Chant]] and then [[Force of Will]]/[[Force of Negation]] it again when we pay, but that poor sequencing is unlikely to happen.
- No Interaction: The game is ours and fairly straightfoward with a little Metalcraft optimization. After [[Orim’s Chant]] resolves, cast [[Dark Ritual]] off of the [[Badlands]] (Storm 3 – ). Cast the exiled [[Wishclaw Talisman]] (Storm 4 – ). With Metalcraft enabled, tap the [[Mox Opal]] for . Cast the [[Mox Opal]] from hand and tap it for mana (Storm 5 – ). Using floating mana, activate [[Wishclaw Talisman]] to find a [[Lion’s Eye Diamond]] and cast it (Storm 6 – ). Cast the [[Burning Wish]]. Hold priority and sacrifice the [[Lion’s Eye Diamond]] (Storm 7 – ). Find and cast the [[Tendrils of Agony]] from the sideboard for 16 damage using the uncracked [[Lotus Petal]].
- One Interactive Spell: Our opponent MUST spend their interaction on this [[Orim’s Chant]]. Otherwise, no further actions can be taken by them. A hard counter will not affect our turn sequence and we can continue comboing like they had no interaction. If [[Daze]] is used, we can cast [[Dark Ritual]] in response and use it to pay (Storm 4 – ). We need to pay for [[Daze]] in the off chance that our opponent is mis-sequencing their counters as noted above. After this, we can deploy our hand as before. But instead of activating [[Wishclaw Talisman]], we can cast the [[Galvanic Relay]] for 6 from hand. We have a [[Burning Wish]] in hand and a [[Wishclaw Talisman]] in play. This is slightly riskier because we have to pass the turn. Our opponent is currently representing 8 damage on board with a potential 10 damage if Delirium can be reached for the [[Dragon’s Rage Channeler]]. For either scenario, a single [[Lightning Bolt]] kills us while only the latter turns off our [[Verdant Catacombs]] in hand as a mana source. But if we are forced to cast [[Galvanic Relay]], there are good options for combo kills the following turn if our 6 exiled cards and two tutors are enough.
Bryant Cook
Realistically, we’re going to need some things to go right to win here. I’d start off by playing [[Badlands]], casting [[Lotus Petal]], and then [[Orim’s Chant]]. In this fantasy world where it just resolves, we then tap [[Badlands]] to cast [[Dark Ritual]] into [[Wishclaw Talisman]] — we now have Metalcraft. Tap [[Mox Opal]] for and then play the second copy.
We now have a decision to make, do we think our opponent is going to win the game on their turn? They have a 5/5 [[Murktide Regent]], [[Ragavan, Nimble Pilferer]], and [[Dragon’s Rage Channeler]], all together this is only 10 damage assuming our opponent re-establishes Delirium. This means that they would need a copy of [[Lightning Bolt]] as well to end the game.
Our two options are to cast [[Galvanic Relay]] and hope the sequence of events described above does not happen or to cast [[Burning Wish]] for [[Echo of Eons]] using our two floating mana. Tap [[Mox Opal]] to activate [[Wishclaw Talisman]] for [[Lion’s Eye Diamond]] and Flashback [[Echo of Eons]] with no mana floating, no land drop, and a spare [[Lotus Petal]].
I’d most likely take the gamble on living with the [[Galvanic Relay]] for 6 copies and then try again next turn. This line can also improve if our opponent casts [[Daze]] on the initial [[Orim’s Chant]] (we would play [[Dark Ritual]] in response and then pay).
Alex Poling
I would start off by playing the [[Badlands]] and [[Lotus Petal]], then tapping the [[Tundra]] to cast [[Orim’s Chant]]. If it resolves, I am good to go for the rest of the turn> But I would still continue if it gets countered. I don’t really think we can afford to wait for a better time. Using the [[Badlands]], I would cast [[Dark Ritual]] and then [[Wishclaw Talisman]] using two of the black mana. Now I have Metalcraft and would tap the [[Mox Opal]] for . Then I could play the second [[Mox Opal]] and tap for a second . Using the last floating , I would activate [[Wishclaw Talisman]] for [[Lion’s Eye Diamond]] and play it. Then using I would cast [[Burning Wish]] and sacrifice [[Lion’s Eye Diamond]] for while it’s on the stack. I would get [[Tendrils of Agony]] and cast it with the floating and the [[Lotus Petal]] with more than enough storm to win the game.
Alex McKinley
Sometimes combo turns depend a lot on what the opponent does. I would start the turn by playing [[Badlands]], [[Lotus Petal]], and [[Orim’s Chant]]. If the [[Orim’s Chant]] resolves, it is clear to go [[Dark Ritual]], [[Wishclaw Talisman]], [[Mox Opal]], [[Burning Wish]], [[Tendrils of Agony]]. Even if the opponent casts [[Daze]] targeting [[Orim’s Chant]], the [[Wishclaw Talisman]] finds the [[Tendrils of Agony]]. If things go very wrong, casting the [[Galvanic Relay]] is an option, while hoping that the opponent does not have a [[Lightning Bolt]].
Greg Sor
I would start the turn by playing [[Badlands]], [[Lotus Petal]], and [[Orim’s Chant]]. If it is not countered, we can cast [[Dark Ritual]], [[Wishclaw Talisman]], add from [[Mox Opal]], play the second copy and add , activate [[Wishclaw Talisman]] and tutor for [[Lion’s Eye Diamond]]. Cast [[Burning Wish]] while holding priority, crack [[Lion’s Eye Diamond]] for and win with [[Tendrils of Agony]]. If our initial [[Orim’s Chant]] get countered by [[Daze]] we try to play [[Dark Ritual]] in response, still covering for an eventual second [[Daze]]. If no more counters are deployed, we will be able to [[Galvanic Relay]] for 7 while keeping our [[Wishclaw Talisman]] in play and [[Burning Wish]] in hand. We are dead to [[Lightning Bolt]] from our opponent. I would not consider the sideboard [[Echo of Eons]] as a winning plan. My answer does not change if the counter is a [[Force of Will]]/[[Force of Negation]]. If double [[Daze]] is used, we can try to buy some time by killing the board with [[Grapeshot]], but it’s not a winning plan.
Want to see your play?
We’re now allowing for fan-based submissions for “Infernal Tutoring!” In order to submit, scroll down to the footer to the contact form. Attach your screenshot, describe the situation in detail, and press submit!
Disclaimer: Regarding the details of the scenarios, we do not want what the outcome of the situation is. For example, if the question is, “Do I go for it here?” do not tell the team if your opponent had [[Force of Will]] or not. This information honestly doesn’t matter for our purposes and it doesn’t change the answer if it’s correct or not to cast the business spell. Thank you for your understanding.
Instructions
- Use the subject line of “Infernal Tutoring”
- Write what list you are playing and if there’s anything special about your list compared to the current stock version. Scenarios that contain the current list are more likely to be selected.
- If possible, please resize your images to be no larger than 1400px wide and preferably under 125kb. This will make our job easier, if you’re unfamiliar how to do this that’s okay too. Still message us with your scenarios!